Get Started in 5 Steps
Don't worry if you're not technical — we'll walk you through everything step by step.
Create a RunPod Account
RunPod provides the GPU power needed for AI image generation
What is RunPod?
RunPod is a cloud service that rents out powerful graphics cards (GPUs). These GPUs are needed to run the AI that generates the selfies. Think of it like renting a super-powerful computer in the cloud.
Create Your Account
- Go to runpod.io
- Click "Sign Up" in the top right corner
- Create an account using your email or Google/GitHub
- Add a payment method (credit card or crypto)
- Add some credits to your account ($25-50 is a good start)
RunPod charges by the hour while your GPU is running. An RTX PRO 6000 costs around $1.84/hour. You can stop the pod when not in use to save money.
Get Hugging Face Access
Required to download the FLUX.2 AI model
What is Hugging Face?
Hugging Face is like a library for AI models. The FLUX.2 model we use is hosted there, and you need an account to download it.
Get Access to FLUX.2
- Go to huggingface.co and create a free account
- Visit the FLUX.2-dev model page
- Click "Agree and access repository" to request access
- Wait for approval (usually instant, but can take a few hours)
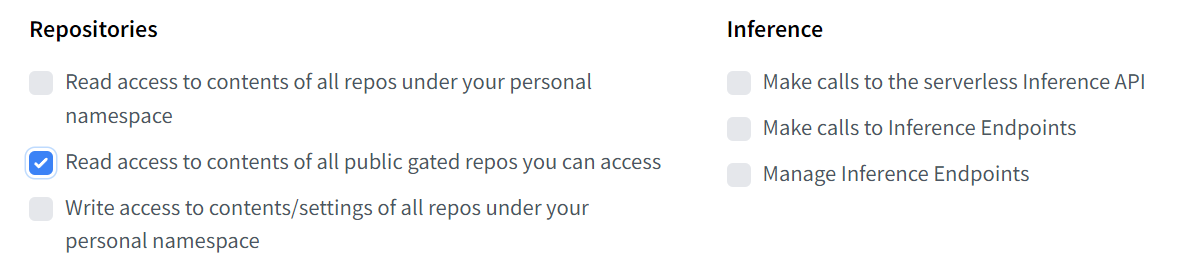
Create an Access Token
- Go to Hugging Face Settings → Tokens
- Click "Create new token"
- Select "Fine-grained" as the token type
- Give it a name like "GenSelfie"
- Under "Repositories", check "Read access to contents of all public gated repos you can access"
- Click "Create token"
- Copy and save this token — you'll need it in the next step!
Keep your token secret! Anyone with this token can access your Hugging Face account. Never share it publicly.
Deploy the ComfyUI Server
This is the AI engine that generates the selfies
What is ComfyUI?
ComfyUI is the software that runs the AI model. We've prepared a special version that's ready to use with GenSelfie.
Deploy on RunPod
- Click this link to deploy: Deploy ComfyUI on RunPod
- Select an RTX PRO 6000 GPU (or equivalent with 96GB+ VRAM)
- Under "Environment Variables", add your Hugging Face token:
HF_TOKEN=your_token_here - Click "Deploy" and wait for the pod to start (this takes a few minutes)
Download the FLUX.2 Models
- Once the pod is running, click "Connect" → "Web Terminal"
- In the terminal, run this command:
bash /download_Flux2.sh - Wait for the download to complete (this can take 10-20 minutes)
Test Your Setup
- Open the ComfyUI interface (click "Connect" → "HTTP Service [Port 8188]")
- Run a test image generation using the default FLUX.2 workflow
- This loads the models into memory, making future generations faster
- If the test image generates successfully, everything is working!
The first generation takes longer because the models need to load into GPU memory. Subsequent generations will be much faster.
Get Your ComfyUI URL
- In RunPod, click "Connect" on your pod
- Look for "TCP Port Mappings" (NOT the proxy URL)
- Find the port mapped to 8188
- Copy the full address (looks like:
123.45.67.89:12345) - Save this — you'll need it for GenSelfie!
FLUX.2 requires a lot of GPU memory (VRAM). The RTX PRO 6000 has 96GB, which is enough to run the model smoothly. Smaller GPUs may not work.
Deploy GenSelfie
Set up the web app your fans will use
Option A: Deploy on RunPod (Easiest)
You can run GenSelfie on the same RunPod account, on a cheaper CPU-only pod.
- In RunPod, go to "Pods" → "Deploy"
- Search for "GenSelfie" template, or use the Docker image:
valyriantech/genselfie:latest - Select a cheap CPU pod (no GPU needed for the web app)
- Add environment variables:
COMFYUI_URL=http://your-comfyui-ip:port - Deploy and wait for it to start
Option B: Run Locally or on Any Server
- Make sure you have Python 3.12+ installed
- Clone the repository:
git clone https://github.com/valyriantech/GenSelfie.git
cd GenSelfie - Install dependencies:
pip install -r requirements.txt - Create your configuration:
cp .env.example .env - Edit
.envand add your ComfyUI URL - Run the app:
python main.py
First Login
When you first run GenSelfie, it automatically generates an admin password. Check the console output or your .env file for the password.
- Open your GenSelfie URL in a browser
- Go to
/admin - Enter the generated password
Configure Your App
Add your branding, images, and create presets
Set Up Your Branding
- In the admin panel, go to "App Settings"
- Enter your app name and tagline
- Choose your brand colors
- Upload your logo and banner image
- Click "Save Settings"
Add Your Reference Images
These are photos of you that the AI will use to generate selfies.
- Go to "Influencer Reference Images"
- Upload 1-5 high-quality photos of yourself
- Use clear, well-lit photos with your face visible
Use photos with good lighting, clear facial features, and minimal background distractions. The AI works best with high-quality source images.
Create Your First Preset
- Go to "Generation Presets"
- Click "Create New Preset"
- Enter a name (e.g., "Red Carpet Selfie")
- Select which reference image to use
- Set the dimensions (1024x1024 is a good default)
- Write a prompt describing the scene
- Set your price (in cents, so $5 = 500)
- Click "Create Preset"
Set Up Payments (Optional)
You can enable promo codes, Stripe (credit cards), or Lightning (Bitcoin).
- Promo Codes: Enabled by default. Create codes in the admin panel.
- Stripe: Add your Stripe API keys to
.env - Lightning: Add your LNbits URL and API key to
.env
Generate Example Images
- Upload some example input images (celebrity photos work great)
- Select a preset and click "Generate All Examples"
- Wait for the AI to generate examples
- These will appear in the gallery on your fan page
Share your GenSelfie URL with your fans and start generating selfies! Consider creating a promo code for your first few fans to test it out.